Blog
You can also view a list of the articles in the blog index page, where you can find old posts.
Subscribe to the blog via RSS
Do not forget to also check the treitos web the repositories
Testing for CVEs in Linux Smart Enumeration
[blog post—standalone]
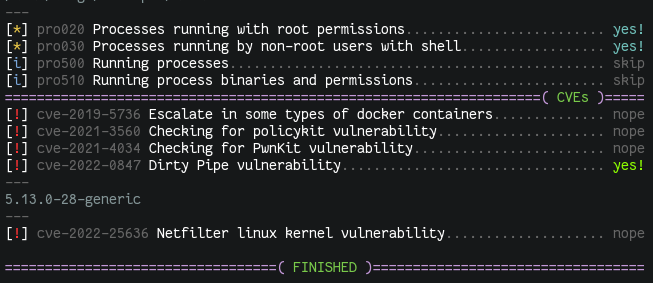
Adding tests for CVEs to Linux Smart Enumeration is something that I've been wanting to do for a while.
However I wanted to do it better than what I've seen in the past with many existing CVE suggesters and testers. Many of these had a lot of false positives so when you get the results they are many times useless and you just have to manually testing them.
The main objective of Linux Smart Enumeration is to provide as concise
information as possible. Only showing more in depth or less relevant
information when the user requests it. I want it to keep it that way also for
the CVE tests.
However the script must also be distributable as a single file so it is
easy to use (copy from server to server, fast download to use process, etc)
and also has to be easy to maintain so I can extended as needed either by
me or by contributors.
With all that in mind, I decided to add a new section called cve inside
the main script, where I am reusing the whole test process to run specific
tests for the different CVEs that I want to include. These CVE tests are
being added to a cve directory in the Linux Smart Enumeration repository
where also a skel.sh file is placed so it can be used as a template.
Now, to include the CVE tests in the main script, the are first
packaged with a new tool called package_cvs_into_lse.sh (quite self
explanatory).
This way, when you run:
$ tools/package_cvs_into_lse.sh
This will generate a new script called lse_cve.sh which contains the CVE
tests inside.
These tests are compressed with gzip and encoded in base64. During
execution, they are uncompressed, decoded and evaluated so each one of them
can be processed as a single test.
Due to the requirement of this build process and to still provide a single
script file that can be just downloaded and used. Now each versions is
published in the GitHub releases page, where you
can download the lse.sh script with all the CVE tests already included.
Note that the one-liners in the README file are already updated to use the
releases URL.
At the time of writing this, only a few CVE tests have been included, which will
hopefully also serve as examples for contributors.
If you want to contribute with more CVE tests, please, read the comments
in the skel.sh file and check the existing cve test files.
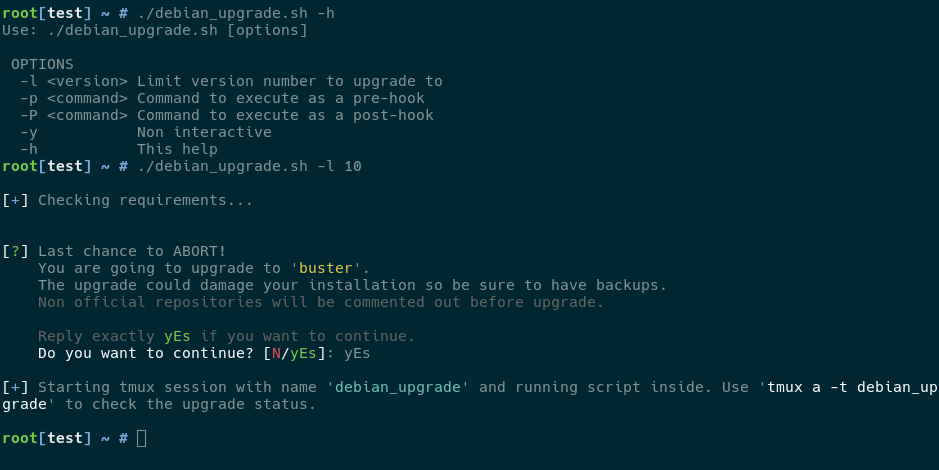
Tue, 15 Mar 2022 15:20 by Diego BlancoScript to upgrade Debian systems
[blog post—standalone]
Upgrading Debian GNU/Linux can be a tedious task if you have several servers
that need to be upgraded. I had many servers that required an OS upgrade and I
couldn't find a tool to ease the upgrade.
I know that automating the upgrade is very complex as it depends on the status
of the server packages. Things like using third party repositories or manually
installed packages will most likely cause troubles during an Debian version
upgrade. However, I decided to code an script to help me upgrade servers
that met the following requirements:
Upgrade using tmux: It is critical that the upgrade keeps running even
if ou lose network connectivity. Not only that, but being able to keep track
of the upgrade or interact after a connection loss is mandatory. tmux
allows to run the upgrade in the background and attach to the upgrade at any
time.
Hook support: Being able to execute commands both before and after
the upgrade adds an incredibly versatility. This was a must-have feature.
Hability to be non-interactive: Although risky, being able to run an upgrade
on its own comes fairly handy in many scenarios.
The script I coded is called simply debian_upgrade.sh and this is how it
looks.
The script is available in my github tools repository.
I've already upgraded many servers with it and it worked surprisingly well im
the vast majority of my installations, having most of them upgraded in a matter
of 30 minutes.
As an example of how I upgraded my LEMP servers, this is the command that I
used in all of them:
./debian_upgrade.sh -p 'env DEBIAN_FRONTEND=noninteractive APT_LISTCHANGES_FRONTEND=mail apt-get purge -y -o Dpkg::Options::="--force-confdef" -o Dpkg::Options::="--force-confold" php* && pip uninstall -y docker docker-py docker-pycreds ; sed -i "s/^innodb_additional_mem_pool_size.*//g" /etc/mysql/my.cnf && systemctl restart mysql'
Here I apply some needed modifications to clean things up before the upgrade.
After the upgrade finishes I just need to run my Ansible playbook to install
all missing packages and configurations.
I hope you find this tool useful. Please feel free to send some feed back via
github or just contact me.
Mon, 07 Jun 2021 00:04 by Diego BlancoLinux Smart Enumeration now serves itself
[blog post—standalone]
The first thing you need to do to use the Linux Smart Enumeration script is to
copy it to your target. I already offer a couple of "one-liners" in the
GitHub repository, but to use them, your target needs to have internet
connection, which is not always the case (i.e. HackTheBox environment).
When your target is inside a network without direct internet access, you have
to copy the lse.sh file over using resourcing to methods like python3 -m http.server or nc -l -p 5555 < lse.sh, etc. This is a boring and tedious
task.
For that reason I included the -S flag to Linux Smart Enumeration in its
2.10 version. When you execute ./lse.sh -S, the script will serve
itself and will print out several possible commands that you can use to copy
it over to your target depending on your IP and available commands.
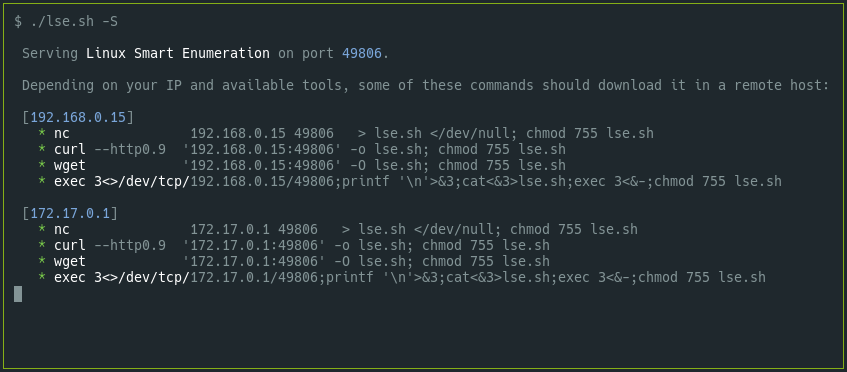
Now you only have to copy and paste the command you like and your copy of
lse.sh will be ready on your destination !!.
Happy Hacking!
Mon, 19 Oct 2020 21:18 by Diego BlancoWebP support for the image compression script
[blog post—standalone]
Long ago I published my image compression script
and it has been very useful to me. I hope it was useful for somebody else too.
I have just added support for *WebP* image format. This image was designed to
further save size of your website images without losing quality. Now, if you
pass the -w parameter to the script, an additional file will be created in
WebP format and appending the file extension .webp. So if your image was
called something.png, the script will create something.png.webp. I will
explain below why to append and not replace the extension.
The idea now is that, when our web server receives a request for an image (i.e.
/img/something.png) It will return the WebP version (i.e.
/img/something.png.webp) if the browser supports WebP or the original if
it doesn't. We know that a browser supports WebP because as part of the
request it will send the HTTP header Accept: image/webp,*.*.
I use and love Nginx as my http server so I will show you how to implement the
above behavior in it.
First of all we will add a map like the one below. A good place to set it is
/etc/nginx/conf.d/webp.conf.
map $http_accept $webp_ext {
    default         "";
    "~*image/webp"  ".webp";
}
This way, the variable $webp_ext will be an empty string if the browser
does not support WebP or it will be .webp if it does support it.
You can now add a section for the images that will look like this.
location ~* \.(gif|jpg|jpeg|png)$ {
    add_header Vary Accept;
    expires 31536000s;
    add_header Pragma "public";
    add_header Cache-Control "max-age=31536000, public, must-revalidate, proxy-revalidate";
    try_files $uri$webp_ext $uri =404;
}
We add the Vary header so any intermediate cache or CDN splits the cache
depending on the Accept header sent by the browser. Note that right now
some CDN services like CloudFlare do not honor the Vary header though.
The real magic happens in the try_files where it will return the WebP
image depending on the value of $webp_ext. I added also a single $uri
just in case, but it shouldn't be required.
With this you should have your setup complete. Do not forget to add a periodic
task via cron or systemd timers to compress and generate WebP versions of your
new images.
#m h dom mon dow command
15 * *   *   *   /var/www/tools/dIb_compress_images -q -c -w /var/www/my_website
Enjoy your performance boost.
Remember that you can get the image compression script from GitHub here: https://github.com/diego-treitos/dgtool/blob/master/compress_images/dIb_compress_images
Thu, 27 Aug 2020 01:28 by Diego Blanco[blog post—standalone]
I've been using Ansible for years and it is great. It allows you to manage
your servers and even having some sort of version control over them. The fact
that it only depends on SSH and no agent in the servers you manage is also very
convenient. However, this design also has its drawbacks: it can be
painfully slow.
In this lengthy post I will show you some good practices, configuration
optimizations and modifications to increase the Ansible performance so your
playbooks take much less time to finish.
Good practices
The way you set up your roles and playbooks has an impact on performance.
Here are some good practices to gain some seconds in your execution
times.
Bundle package installations
By default, if you use a loop (or with_items) with a package module
like apt, Ansible will execute the package manager once per loop, which
is very slow. To prevent this, you can set the squash_actions parameter in
Ansible configuration, however this will be soon deprecated, because there
is a better way.
Since Ansible 2.3 passing a list of packages to the name parameter
of most of package modules is allowed. This way, the package manager will
execute only once to install all the packages at the same time.
Try to add as many packages as you can to a single ansible task. You can
add them to a basic role instead of installing these different packages
in different roles with their own package (or apt) statements.
For example, I have something like this in a role called common, that is added
to all my servers.
---
- name: Install basic packages
  apt:
    state: present
    name:
      - apt-config-auto-update
      - apt-transport-https
      - ca-certificates
      - less
      - python3-pip
      - python3-setuptools
      - rsync
      - sudo
      - tmux
      - unattended-upgrades
Use fast repository mirrors
When installing packages you want to download them as fast as possible so
configure your servers to use the mirrors that are closer to them.
You can use tools like netselect-apt for Debian will help you with that.
If you have servers in different regions, you should configure different mirrors
per region for your servers.
You can also consider to use mirrors that are in a geolocated CDN so the URL
always resolve to a near server.
Use a high package cache ttl
Package modules like apt allow you to specify a valid_cache_time in
Ansible so you even when an update_cache is called, this will not run
while the cache is still valid.
It is generally a good idea to set valid_cache_time to one or several
hours.
---
- name: Update apt cache
  apt: update_cache=yes cache_valid_time=7200
NOTE: In Debian be sure to have installed apt-config-auto-update so a
timestamp file is created when updating the package catalog. Check
this bug for more
information.
Avoid downloading from 3rd parties
It is not uncommon that during a playbook run you need to install something
from an external URL. For example, if you want to install wp-cli, you
could run
---
- name: Install wp-cli
  get_url: https://raw.githubusercontent.com/wp-cli/builds/gh-pages/phar/wp-cli.phar
  dest: /usr/bin/wp
  mode: '0755'
However, in my experience, it is better to have the file stored locally so
you can grant it's availability, version and download speed.
---
- name: Install wp-cli
  copy:
    src: wp-cli.phar
    dest: /usr/bin/wp
    mode: '0755'
Use free strategy
You may not know that Ansible allows you to use strategies in your playbooks. By default, the
linear strategy is used, which executes each task in all hosts at the
same time so no host will execute the next task until all hosts finish the
previous one.
If your playbook does not require this synchronization or simply if your servers
are completely independent from each other, you can use the free strategy
in your playbook so your servers won't wait for each other.
---
- hosts: all
  strategy: free
  tasks:
  ...
Use asynchronous tasks
All the tasks are executed in a sequence, but we can break this sequence and
run tasks asynchronously using async, poll and until. This can be
a complex setup so be sure to check the documentation
about it.
Here is a little example from the ansible documentation to give you some idea
of how it works.
---
- name: 'YUM - async task'
yum:
name: docker-io
state: present
async: 1000
poll: 0
register: yum_sleeper
- name: 'YUM - check on async task'
async_status:
jid: "{{ yum_sleeper.ansible_job_id }}"
register: job_result
until: job_result.finished
retries: 30
Gathering facts
Gathering facts is time consuming so you better be sure to know if you need to
gather them and when.
Smart gathering
You can configure Ansible to gather facts only once so if you include a
different playbook they are not gathered again. You can do this by setting the
gathering to smart in the Ansible configuration file.
[defaults]
gathering = smart
Caching facts
You can cache facts so they do not have to be gathered again in subsequent runs.
There are several cache backends that you can
configure. Using redis in your ansible.cfg would look like this:
[defaults]
fact_caching = redis
fact_caching_prefix = ansible_facts_
fact_caching_connection = localhost
fact_caching_timeout = 21600
Don't gather facts if you don't have to
If you are not using facts in your playbook, you can skip the fact
gathering by setting gather_facts to False.
---
- hosts: databases
  gather_facts: false
  tasks:
  ...
General configuration
Some general Ansible configuration options that will boost performance.
Remember that the configuration file will be in /etc/ansible/ansible.cfg
or in your home directory in ~/.ansible.cfg.
SSH configuration
As SSH connections are the backbone of the communications with the hosts, we
should be sure that we have an optimal configuration for this. There are several
settings that we must include for better performance.
First of all we must configure ControlPersist so connections to
servers can be recycled. Be sure to also set control_path to store the
persistent sockets.
If you are using SSH Public Keys for authentication I suggest to also set
PrefferredAuthentications to publickey so you do not run into delays in
servers that have GSSAPIAuthentication enabled.
The other important setting is pipelining, which reduces the number of SSH
connections required to run some modules.
After the changes your SSH settings should look like this
[defaults]
ssh_args = -o ControlMaster=auto -o ControlPersist=3600s -o PreferredAuthentications=publickey
control_path = %(directory)s/ansible-ssh-%%h-%%p-%%r
pipelining = True
Forks
If you are running a playbook in many servers and you have enough processing
power in your Ansible server, you might want to increase the number of
forks.
Depending on your resources, you can test different values for forks in your
configuration file. The default is 5 so you might want to test higher
values.
[defaults]
forks = 20
Mitogen
There is a strategy plugin for Ansible called Mitogen. This plugin is
able to speed up the performance of your playbooks like magic.
There are some things to take into account, though. There might be conflicts
with the current strategies configured in your playbooks and also some tasks
my not work with the mitogen_linear strategy (i.e.: raw tasks).
To configure it you only have to download it from the Mitogen website, making
sure to get the right version for your Ansible version and uncompress it
wherever you want. Then you must add this to your configuration file in the
defaults section.
[defaults]
strategy_plugins = /path/to/mitogen/ansible_mitogen/plugins/strategy
strategy = mitogen_linear
Debugging
If you want to know which tasks take more time and have a nice summary, you
can add this to your configuration.
[defaults]
callback_whitelist = profile_tasks
stdout_callback = debug
Some results
I've tested the very same playbook with the very same hosts, around 50
servers, with and without all the above optimizations. The difference is
incredible!.
Running ansible-playbook -D playbook.yml -C before the above optimizations
it took around 2 hours and 15 minutes to complete. Yes, it is a complex
playbook with hundreds of tasks.
Running the same command with the above optimizations it took less than 15
minutes!.
The tests were run from very similar machines using the same network connection,
being the non optimized machine the one with slightly better system resources. I
also run the test twice with the same results, so it is consistent.
I hope you find this post useful and that you can save some of your time by
putting these tips into practice.
Thu, 23 Jul 2020 17:46 by Diego Blanco
Linux Smart Enumeration 2.0: POSIX edition
[blog post—standalone]
There have been several tickets related in one way or another with POSIX
compatibility. There were problems with the script not executing under dash,
having errors in old bash versions, etc.
I did not think about migrated it to POSIX compliance because I was using data
structures like arrays and other handy features that new bash versions
have but they are not available under the POSIX standard.
However I decided to take a look to see how hard can it be... and it was way
easier than I though. Nevertheless it took some creativity to simulate arrays
and to workaround other issues.
I also found some tools that help to diagnose problems in the scripts, like
shellcheck, which is a shell linting program or posh the
Policy-compliant Ordinary SHell. Now Linux Smart Enumeration runs in
posh!
There are still some minor things that are still not 100% POSIX but they seem
to be very well supported across different shells and versions. One of them,
for example is the use of local reserved word to define local variables.
All in all I regret not having tried this migration before and I am very happy
that it is working now.
You can now try the mostly POSIX compliant and updated version 2.0
of Linux Smart Enumeration.
Sat, 09 May 2020 16:30Resetting your AWS EC2 keypair
[blog post—standalone]
I had to access to an AWS EC2 instance but all I got was access to the AWS
Management Console. No KeyPair (a.k.a. SSH Public Key) so no way to
access via SSH. Also the EC2 Instance Connect which should allow to connect to
the instance via a browser-based SSH connection.
I started looking for information and this AWS support article was the only think I found and... it did not work, of course.
Any other article mentioned methods that didn't really work either. So I
investigated a bit more and finally got it, but I was so frustrated that this
was so hard to find that I had to write a post about it.
First of all, for this method to work, you will need to stop the instance
so it is important to understand the implications of this. If the instance is
not using persistent storage you could lose data when you stop it. In my
case it was using EBS or Elastic Block Storage so I didn't had to worry
about it.
The rescue here is to use what is called the instance User Data, which
allows to configure or execute things in the instance in several configurable
situations.
So here are the steps:
Stop the instance.
Select the instance and then click on Actions >> Instance Settings >>
View/Change User Data.
Here you can add code to be executed in the next boot like this (replacing SSH_PUBKEY with your key):
#cloud-boothook
#!/bin/bash

SSH_PUBKEY="ssh-rsa
AAAAB3NzaC1yc2EAAAADAQABAAABgQCf5C5DQwLJXnBNUIE/FeuEmPS0WqVKwCl2hemyoESNUhnsxPwfz17+wjT/AduShkqmeVd+qLJi/rxKJBWAQZuTk6bc8kVabT1VzH7Jls1zcDXo3VHkN1udTidXMSoyPc3Xzez4LrnJqNzsEDf/wXurFP3FSQwLDe+DWJWXha0a8hBKCBSWdavsJwDEZTUQWbLMH9i2pZE4Z65yT5YO/T1J5b4BkUapcOzbYKP7SxiWkhpPvda9xB5wzmO9o3IgpsHIi5gs2M4eYHGH3YSyIkFxI0M97W0KjrkLqi+iOkeeOaaOdJFSBL0EAmh0LsojSoDlts9vBoLX8F5JeXtt4HyUHMuIqFMxP+FpwZIoAiQybfR71xu8/SJX0U8LfdU1eFgfncK6+yCIDGLt8MKV7sHSbIzZtBaTVXGFiMREtu/UcyOu4qWludx1ui17WGX0B2K9xREU/DRhVQWweIMJdLMXVFuA7qTQdy/IYZ+W7Uu1k9NPXI4+y584olXL3ILpTN8="

sed -i 's/^PermitRootLogin .*/PermitRootLogin without-password/g' /etc/ssh/sshd_config
systemctl restart sshd.service

mkdir -p /root/.ssh
chmod 700 /root/.ssh

printf '\n%s\n' "$SSH_PUBKEY" >> /root/.ssh/authorized_keys
chmod 600 /root/.ssh/authorized_keys
Start the instance.
Check via ssh that you have access
Stop the instance again.
Remove the User Data that you added so it does not run again each time the instance boots.
Start the instance.
I hope this is helpful to anybody that faces the same problem.
Tue, 05 May 2020 01:16SSL on old new hardware
[blog post—standalone]
I had to configure a newly purchase network KVM, which allows remote control
of several servers using the VNC protocol. It had a web interface to
configure it and it was enforcing HTTPS, which means that a request to plain
HTTP was redirected to HTTPS.
There was only one problem. Whenever I tried to connect, my browser (Firefox of
course) would throw a HTTPS handshake error. As I was accessing the KVM via
an odd proxy/VPN via web I immediately thought that this middle hardware could be
doing some shenanigans.
However after further testing I could confirm that the problem was not this
proxy/VPN, as I was also getting an error from a server inside the same network.
curl -vvvk 'https://192.168.1.250/'
*   Trying 192.168.1.250...
*   TCP_NODELAY set
*   Connected to 192.168.1.250 (192.168.1.250) port 443 (#0)
*   ALPN, offering h2
*   ALPN, offering http/1.1
*   successfully set certificate verify locations:
*   CAfile: /etc/ssl/certs/ca-certificates.crt
  CApath: /etc/ssl/certs
*   TLSv1.3 (OUT), TLS handshake, Client hello (1):
*   TLSv1.3 (IN), TLS alert, Server hello (2):
*   error:14094410:SSL routines:ssl3_read_bytes:sslv3 alert handshake failure
*   stopped the pause stream!
*   Closing connection 0
curl: (35) error:14094410:SSL routines:ssl3_read_bytes:sslv3 alert handshake failure
This error gave me the clues I needed. What if this new purchased hardware had
been shipped with old enough software that its web interface only
supported SSLv3, which is nowadays completely deprecated due to the POODLE
vulnerability ?
I found that Firefox had disabled SSLv3 support in Firefox 34
so I downloaded a portable version of Firefox 33 and tried to access... and it
worked !!
Of course the very first thing I did was to update the firmware and after
this I could access from any browser of software.
This will help me remember that when buying new hardware I might still get
old vulnerable software.
Sat, 29 Feb 2020 17:59